The more useful and relevant the information displayed on your site, the better your chances are for ranking in terms of SEO. When you provide the ability for your customers to answer their own questions this creates a better user experience. A common method to display useful information is in an organized tab on the product page, to provide their customers a better understanding of products. In this article, we will walk through the steps to create and add additional details tabs to your product information section in Magento
We already discussed how to create a product attribute, add it to an attribute set and make it visible in the product front end. You may also know that once you set the “Visible on Catalog Pages on Store Front” to Yes, the “More Information” tab will show up. However, if you want to add an additional custom tab to this area, you will need to go through the following steps.

Step 1: Create a Product Attribute and Assign to an Attribute Set
In your Magento 2 admin, create the attribute you would like to add to as a More Information tab section. Don’t forget to assign the attribute to the attribute set you are using. Note – it doesn’t matter which group you assign the attribute to. However, we usually like to keep these tabs in the same group for easy admin navigation:

Be sure to check out our detailed article about product attributes creation and attribute set assignment for more information.
Make sure you populate the new attribute with the relevant information for the products you would like this attribute to display on:

Step 2. Adding the New Tab to a Product Page: Creating catalog_product_view.xml
Now that we have our attribute set up for the additional tab, we need to create a new xml file and an additional phtml to help add this new attribute as a details tab.
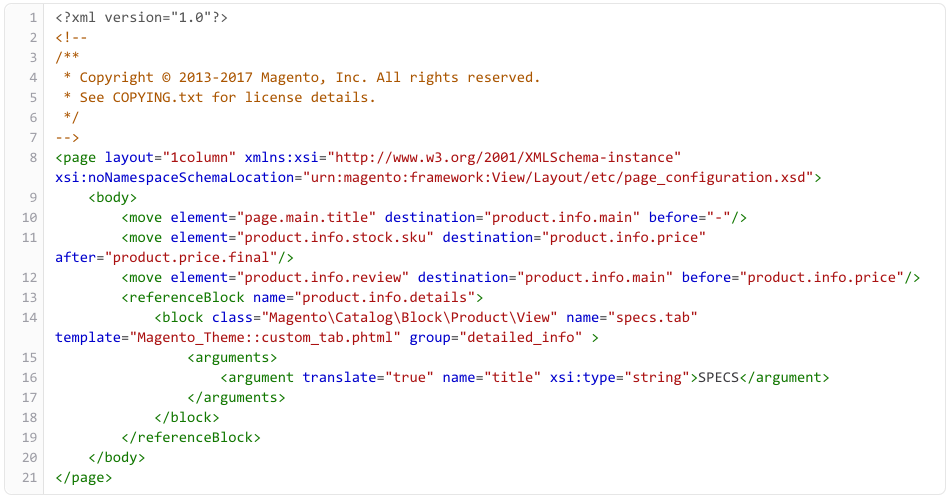
Create an .xml file with the following code:

Since we already had this file created, we only had to add the new tab code to it:

Save this file as “catalog_product_view.xml” to upload to your site’s files. Back in your site’s file structure, navigate to the following location:
/app/code/<your_vendor_name>/<your_theme_name>/view/frontend/layout and create the following file catalog_product_view.xml.
In our case, this was the path: /app/code/Magento/Theme/view/frontend/layout. In this directory, upload your new catalog_product_view.xml file. If it was already there, you will need to override it.
TIP: Always keep a copy of the old file you have, if you end up overriding this file, you may end up temporarily breaking your product pages, and this back up will help you revert your work easily. Simply load it back and override the new file you just loaded.
Step 3: Adding the New Tab to a Product Page – Creating custom_tab.phtml
As you can see in step 2, we still need to create the connection between this new attribute tab and the theme. For that, we would like to create the following new file and add the following quote to it:


Save this file as “custom_tab.phtml” to upload to your site’s files.
Now navigate to the following location:
app/design/frontend/<your_vendor_name>/<your_theme_name>/view/frontend/templates and load the new new_tab.phtml file.
Step 4: Review
Now that we have all the correct setup for our new attribute to show. In Magento’s admin panel, making sure our products have the new attribute properly populated, we will now go to System > Tools > Cache Management and Flush Cache Storage. You are now ready to view your changes in the front end.

Recap
You should now have a better idea of how to create and add new product attributes in Magento 2 and add them as a new product details tab. You should now be able to add as many additional product details tabs as necessary for your users to find your site as informative as possible. Contact us for consultation, database architecture, and planning for your site!

