In Magento Commerce, the question of how do you best build products with multiple options isn’t straightforward.

 In this tutorial, Lonny Burgos, a Magento Certified Developer, guides you through the process.
Questions? Need help with your Magento site? Call us – 303.473.4400 or visit here to have a real person contact you now >>
Four Main Steps to Building Configurable Products with Multiple Options
- Build the Attributes – these are the options that will show up as dropdowns on the product page.
- Add the Attributes to an Attribute Set – the attribute set will provide an easy way to reuse the attributes for other products.
- Create Simple Products – these are the individual products for each option.
- Create Main Configurable Product – this main product will house all the simple products.
To better understand the relationship between the Main Configurable Product and the simple products, I will outline a simple scenario:
I have a product called Crispy Tee:
- This product is manufactured in 2 sizes (small and medium), and 2 colors, red and white.
- I will have to build out a total of 5 products:
- 1 Main Configurable Product
- 1 Simple Product – small/white
- 1 Simple Product – small/red
- 1 Simple Product – medium/white
- 1 Simple Product – medium/red
- I intend for the customer to pick out the size and color of my Crispy Tee product before they add it to the cart.
Step 1 – Build the Attributes (aka the options size and color)
Lets begin by building out the new attributes for our Crispy Tee. I am going to use the following attributes names:
- crispyshirtsize
- crispyshirtcolor
In the admin, navigate to Catalog->Attributes->Manage Attributes. Notice the Add New Attribute button to the right and click on it. (Right Side of screen)
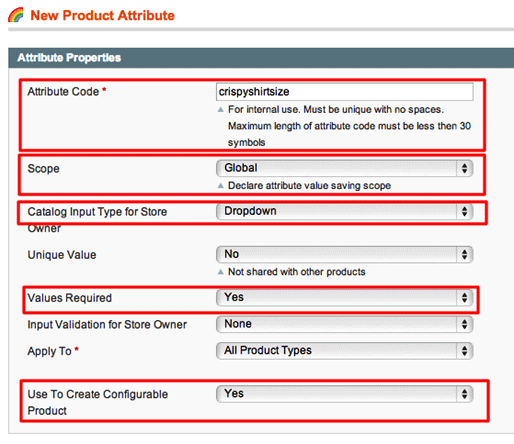
Be sure to set the following for each attribute:
- Attribute Code – the internal name of the attribute must be lowercase.
- Scope – set to Global otherwise the attribute will not be visible throughout the site
- Catalog Input Type Store – set to Dropdown, this setting will come into play later when we are setting up the Main Configurable Product.
- Values Required – set to Yes so that the customer will be forced to pick both a size and color for the shirt.
- Use to Create Configurable Product – set to Yes so that this attribute will be included in the list of options for the Main Configurable Product.
After these options are set. Click on Manage Labels on the right-hand side.
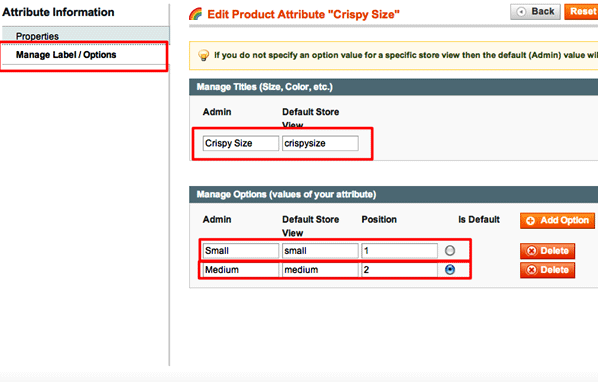
Set the titles:
- Admin – Uppercase name that will show in the Manage Admin screen under Attribute Label
- Default Store View – Lowercase label that will show on the frontend product page.
Manage Options:
Since we selected this option as a dropdown, the options need to be defined by clicking on the Add Option button. The options cannot be empty
- Admin – Uppercase name that will show in the backend.
- Default Store View – Lowercase dropdown option that will show on the frontend product page.
- Position – Sort the dropdown. In this case small will show up before medium in the dropdown.
- Is Default – Select the dropdown option that dropdown will automatically default to the selected option.
Now Click on the Save the Attribute button.
Repeat Step One for each attribute. In this case, I will repeat for the crispyshirtcolor attribute.
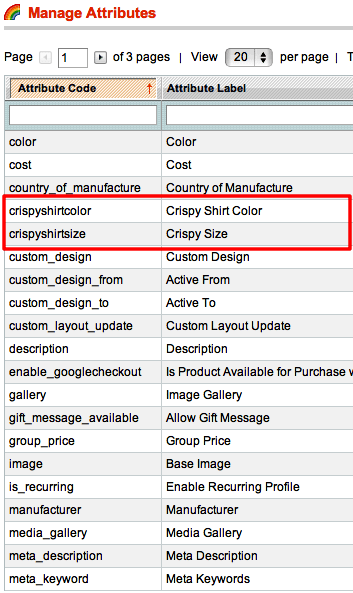
The new attributes should now be visible in the Manage Attribute screen. Now it is time to move onto Step 2 – Add the Attributes to an Attribute Set.
Step 2 – Add the Attributes to an Attribute Set
Navigate to Catalog->Attributes->Manage Attribute Sets and click on the Add New Set Button in the top right corner.
In the next screen, add a new name and base this attribute off of Default.
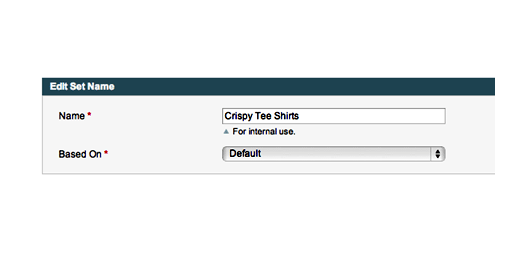
Now Click on the Save the Attribute Set button.
At this point, the newly created attributes need to be added to the attribute set. The new attributes are located under Unassigned Attributes.
Click and drag the newly created attributes from Unassigned Attributes and place into Groups. See screenshot below.
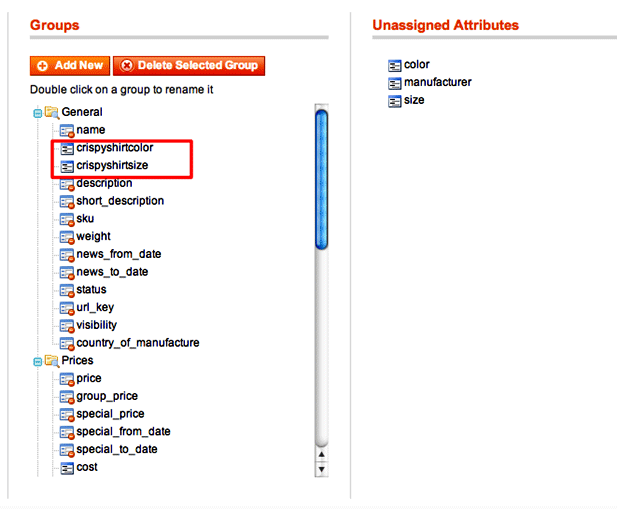
Now Click on the Save the Attribute Set button.
At this point, the new Attribute Set should appear in the Manage Attribute Sets screen. The next steps are to add the products and attach the attributes along with attribute sets.
Step – 3 Create Simple Products
Navigate to Catalog->Manage Products and locate the Add Product button.
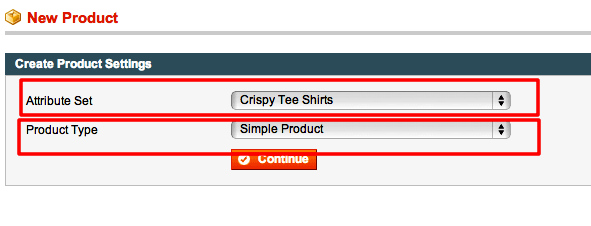
Create Product Settings:
- Attribute Set – Set this option to the new attribute set that we created in Step 2, Crispy Tee Shirts.
- Product Type – Set this option to Simple Product.
Click on the Continue button.
Now, the product’s configuration will be need to be setup in the General, Prices, Inventory, Categories sections in the left sidebar menu.
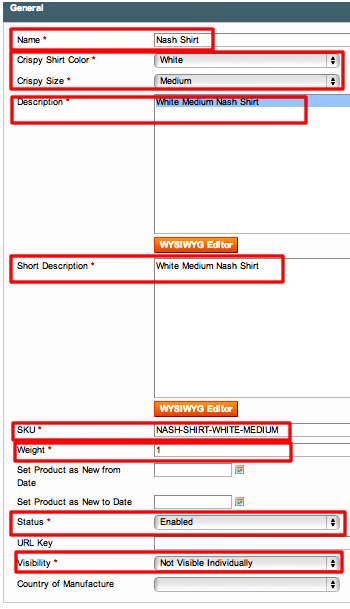
Set the General Settings:
- Name – the product name that will be used for all the Simple Products and the Main Configuration Product
- Crispy Shirt Color and Crispy Size – each simple product will have a different option enabled. For the first simple product we will use the default dropdown options: white and medium.
- Description – Enter a description of the product.
- Short Description – Enter a short description of the product.
- SKU – Enter a unique value for the SKU.
- Weight – Enter a weight value
- Status – Set this option to Enabled.
- Visibility – Set to Not Visible Individually. This option is important so that the simple product does not show on the frontend. The product will hide inside the Main Configuration Product.
Next move onto the Prices section.
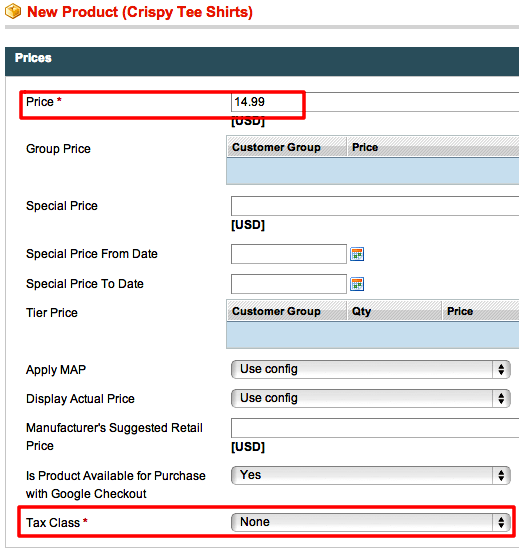
Set the Prices Settings:
- Price – Set a price for the simple product.
- Tax Class – Set this value to the desired Tax Class, cannot leave blank in order to save the product.
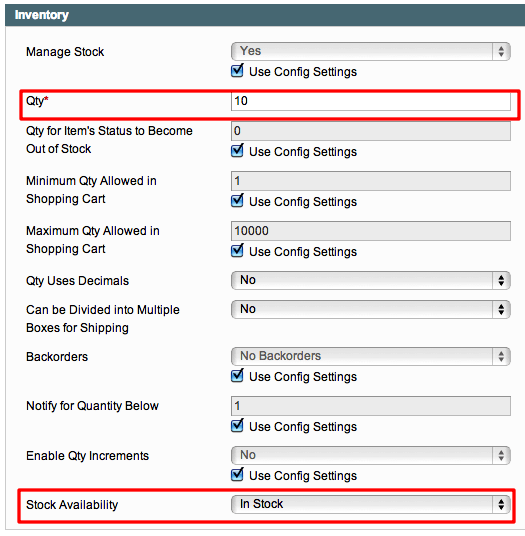
Setup Inventory Settings:
- Qty – Set a number of available products in stock.
- Stock Availability – Set to In Stock so that the product is available.
Click on the Save button to save the product.
The product should now be added to the Manage Product screen.
So now, the other simple products need to be setup with the alternate options:
- 1 Simple Product – small/white
- 1 Simple Product – small/red
- 1 Simple Product – medium/white – Created
- 1 Simple Product – medium/red
In order to easily setup the alternate simple products. Click on the first simple product and in the Product Information screen, locate the Duplicate button.
A duplicate of the medium/white option will be created. Change the attribute options to medium/red and change the Status to Enabled. Keep everything the same, except for Description, Short Description, and SKU in the General Settings. Go through the Prices, Inventory, and Categories Setting to configure the product correctly.
Price Settings:
Be sure that a price and tax class are entered.
Inventory:
Be sure that a value is assigned to Qty and set the Stock Availability to In Stock.
Categories:
Add the product to the correct categories.
At this point, if everything is setup. Click on the Save button.
Repeat the duplication process for each attribute option.
All the following Simple Products should be created:
- 1 Simple Product – small/white – Created
- 1 Simple Product – small/red – Created
- 1 Simple Product – medium/white – Created
- 1 Simple Product – medium/red – Created
The last step is to create the Main Configurable Product. This product will be visible on the frontend and will contain all of the simple products.
Step 4 – Create Main Configurable Product
First, copy the name of the product from the simple products that we created. In this scenario all 5 products will have the name Nash Shirt.
Add a new product from the Manage Product screen.
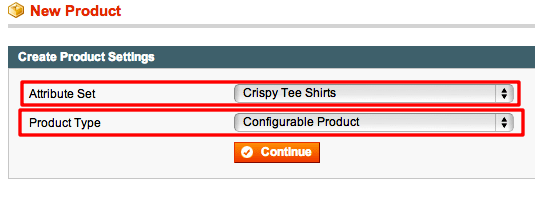
Configure the Create Product Settings:
- Attribute Set – Set to the same attribute set as the simple products, in this case, Crispy Tee Shirts.
- Product Type – Set to Configurable Product. This option is setting up the Main Configurable Product.
Click Continue.
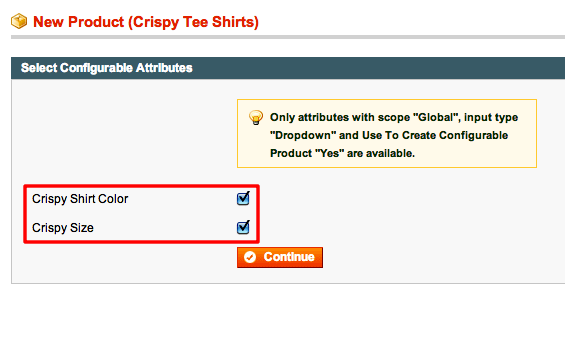
Since we setup our attributes to Global, Dropdown, and to use with the Main Configurable Product, the options/attributes will be available. Enable both attributes.
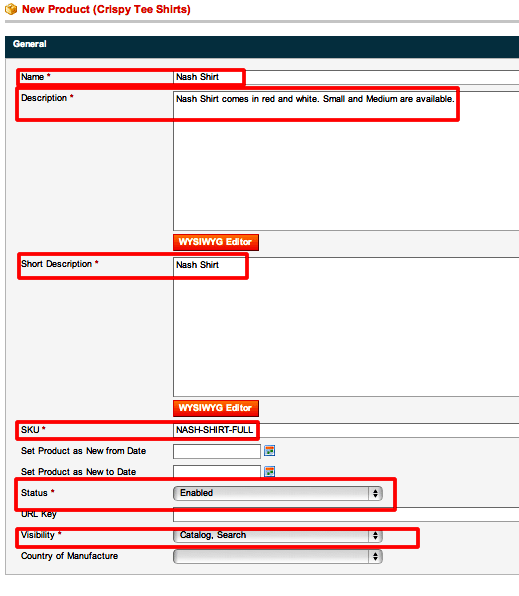
Set the General Settings:
- Name – the product name that will be used for Main Configuration Product.
- Description – Enter a description of the product.
- Short Description – Enter a short description of the product.
- SKU – Enter a unique value for the SKU.
- Weight – Enter a weight value.
- Status – Set this to Enabled.
- Visibility- Set this to Catalog, Search so that it is visible in the frontend and included in the search.
Next move onto the Prices section.
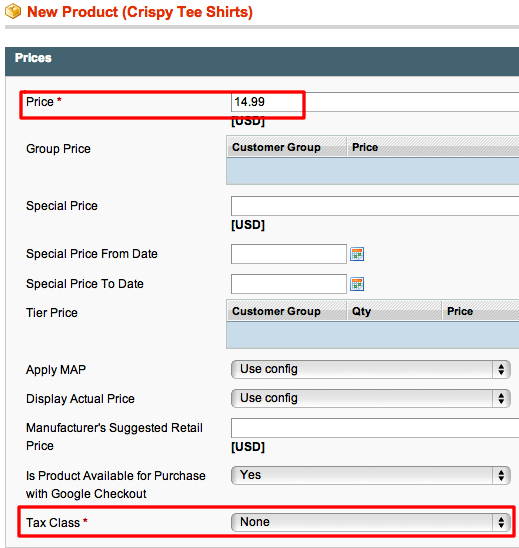
Set the Prices Settings:
- Price – Set a price for the simple product.
- Tax Class – Set this value to the desired Tax Class, cannot leave blank in order to save the product.
Next Add the images for the main configurable product

Use the Browse Files and Upload Files buttons to add the image.
Set an image Base Image, Small Image, and Thumbnail.
In this case, I only added one image, however multiple images can be added.
Next set the Inventory Settings:
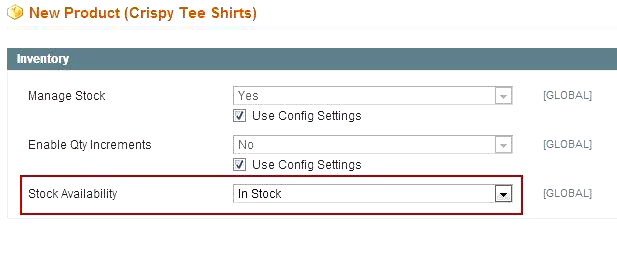
Stock Availability – Set the Main Configurable Product to In Stock.
Next set the Categories for the Main Configurable Product.
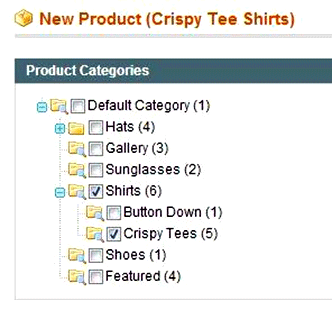
Now the Simple Products need to be added to the Main Configurable Product. To assign the Simple Products, navigate to the Associated Products in the left sidebar Product Information menu.
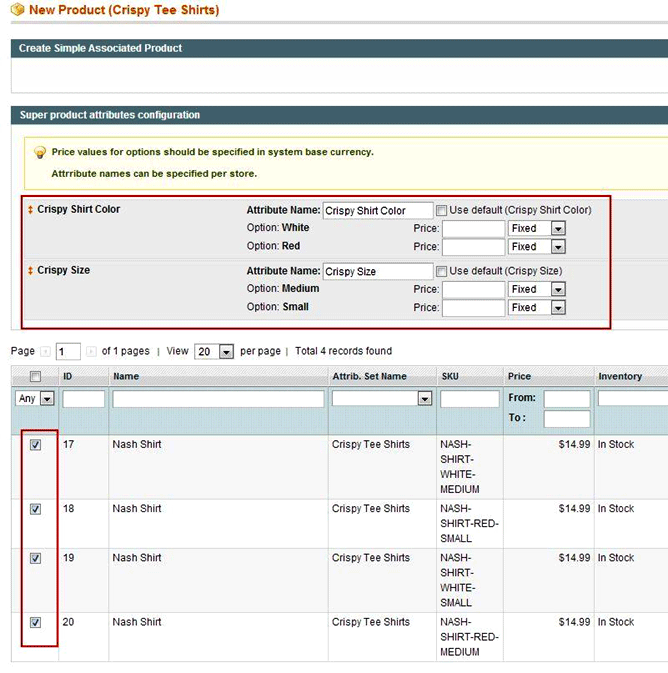
Use the top portion to add a different price for specific options.
Add all of the Simple Products.
Click Save.
Navigate to the Main Configurable Product in a web browser.
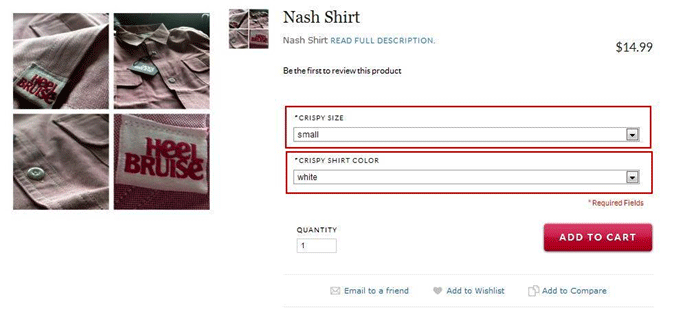
The attributes/options will now be required before the customer adds the product to the cart.
Conclusion – Magento Configurable Products:
Once the entire is process has been completed. Magento makes it very easy for you to reuse attribute sets. In the scenario above, assume that the Crispy Tee now comes in blue and xsmall.
To accommodate for this change, the blue and xsmall features would be added to the dropdown for each existing attribute as follows: (Step 1)
1. crispyshirtsize – xsmall
2. crispyshirtcolor – blue
Next a simple product would need to be added similar to Step 3. Finally, the simple product would need to be included in the Associated Products in the Main Configurable Product.
Alternately, if you did not want to offer a small/white any longer. Then you would disassociate that simple product from the Associated Products in the Main Configurable Product.
Questions? Need help with your Magento site? Call us – 303.473.4400 or visit here to have a real person contact you now >>
